Appearance
Realm Collector
Realm Collector is an Open Telemetry Collector (OTel) distribution. Configuration and management are facilitated through the web console (control plane). This eliminates the requirement for manual modification of configuration files on the virtual machine. The collector is pre-configured for secure communication with Realm cloud, incorporating automated certificate rotation. It is optimized for high-volume workloads through the utilization of disk buffering and batching.
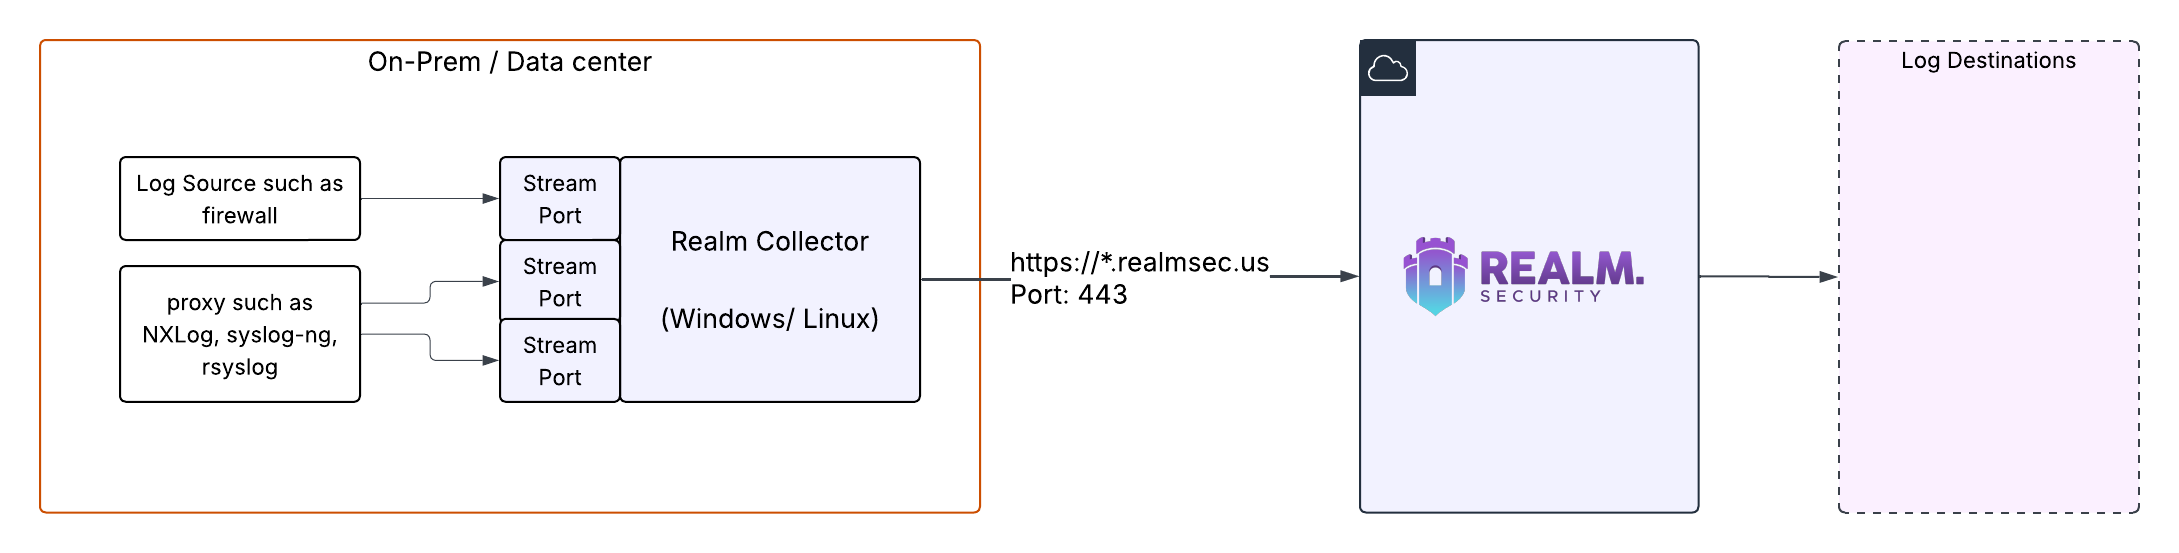
Realm collector receives data from the log sources on configured stream ports and forwards it over to the Realm Cloud. Realm cloud never reaches out to Realm collector. Realm collector always initiates the connection to Realm Cloud.
Install Realm Collector
Collector is typically installed on a VM/container.
VM Requirements
- 64-bit processor (Intel or AMD)
- 2 CPU cores, 4 GB memory for a load of 10,000 events/sec. For higher log volume, allocate proportionately more memory & CPU to the VM.
- 50 GB free disk space
- Supported Platforms
- Linux: Realm Collector is compatible with most major Linux distributions including Ubuntu, RHEL derivatives, as well as cloud variants like Amazon Linux.
- Windows: Windows 10, Windows Server 2016 or above.
- Installing the collector as a Windows service requires administrator access.
- Static IP address or a DNS name for the VM
Outbound IP/Port Allow List
Realm Collector uses the following FQDN/IPs and ports for network communication. In restricted/locked down networks, it is typically necessary to punch a hole through the firewall to allow these connections.
- Inbound: Port is user-defined in Realm Console.
- Outbound: Here are the three URLs that the collector communicates over with Realm backend.
Protocol: TCP
Port: 443
IP Addresses:
text
18.220.219.115
13.58.136.153
3.143.123.136
3.139.32.204
3.140.52.245
13.59.168.65FQDN: api.realmsec.us
- Purpose: Collector uses this endpoint to periodically poll for config updates.
FQDN: *.otlp.ingest.realmsec.us
- Purpose: This is the data ingestion endpoint. Collector sends all log data to this endpoint.
FQDN: health.ingest.realmsec.us
- Purpose: Collector sends its operational metrics for health monitoring to this endpoint.
Realm Console
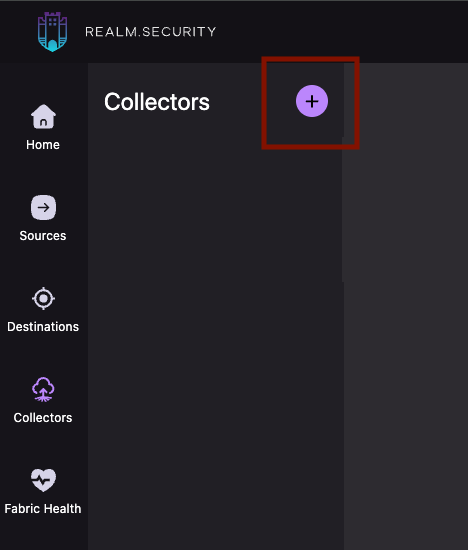
Create Collector
- In Realm, go to Collectors > Add Data Collector
- Type a name for your collector, which typically represents the data center where the collector will be running. For example "US-East Collector"
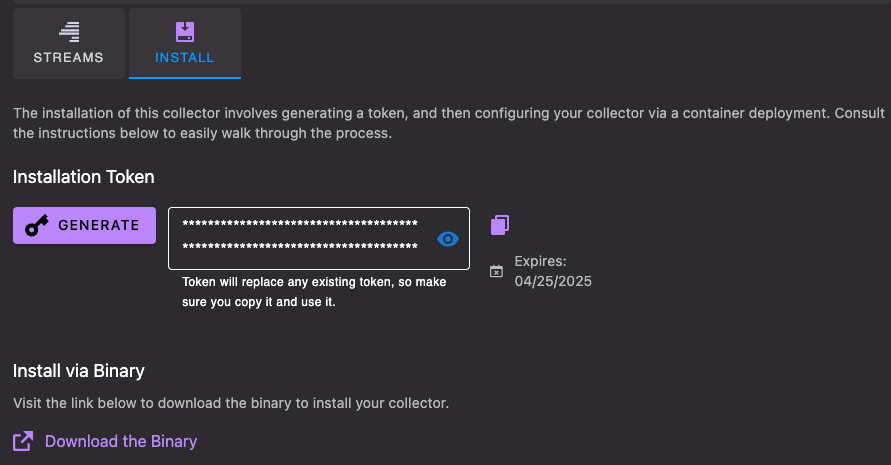
- From your collector page, go to the Install tab and Click Generate
- Copy the collector install token, you will need it later when installing the collector
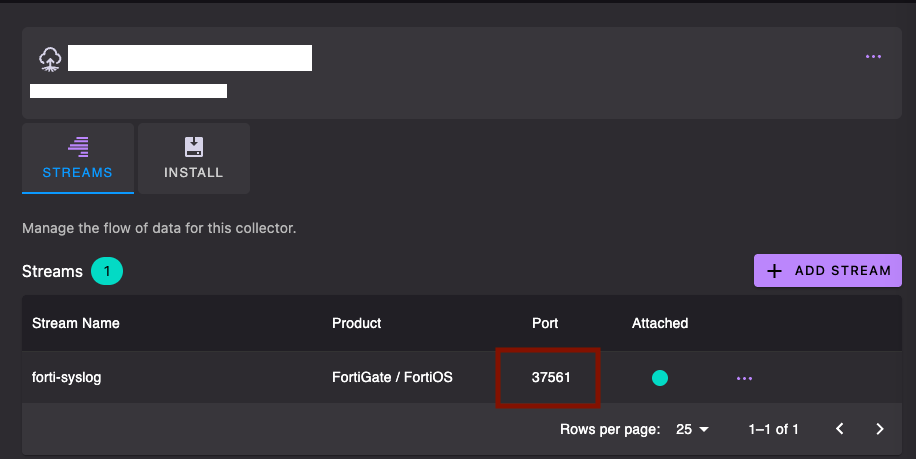
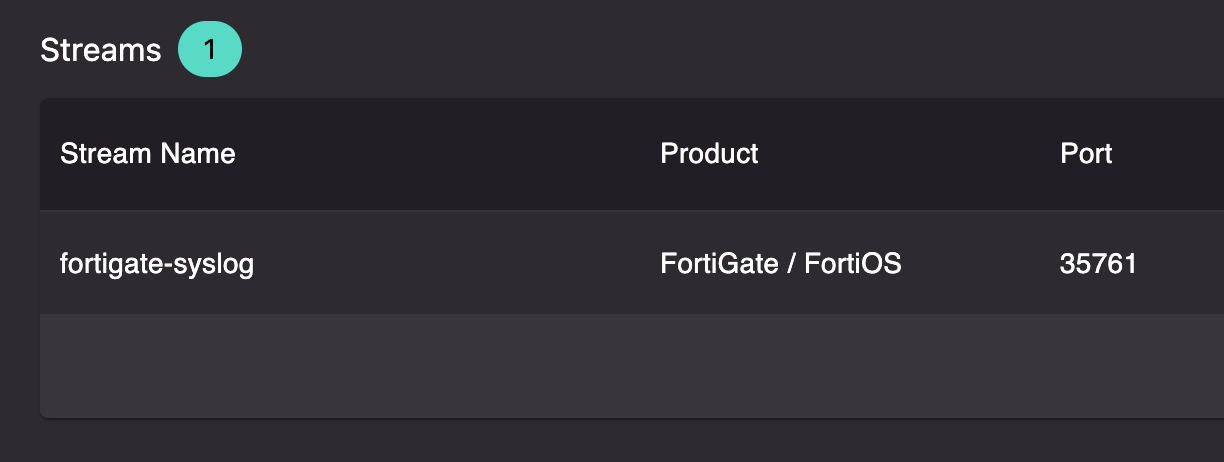
Create Streams
- Click Add Stream from your Collector page
- Name the stream, this typically matches the device/appliance generating the logs (such as a firewall, DNS router etc)
- Choose the product you want to stream, such as "Fortigate"
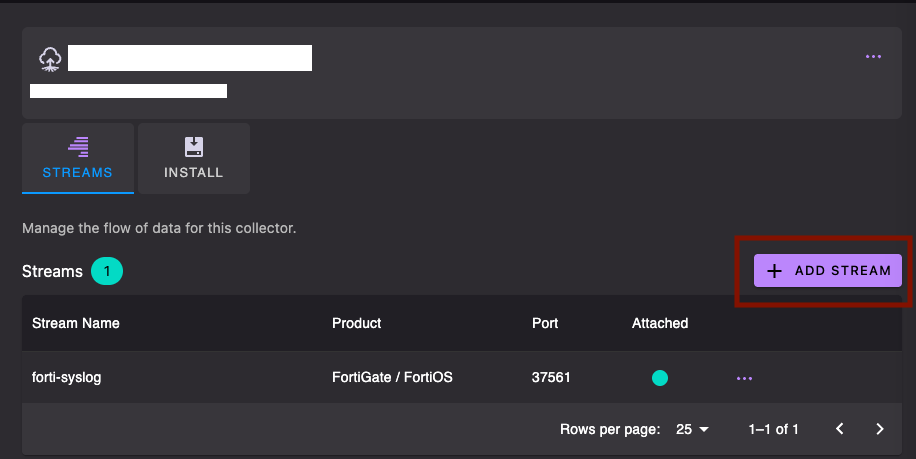
- Note down the receiving port for the data
Deployment topology
Either of the following strategy works each with its pros and cons.
- Configure multiple log sources (from the same vendor) to send logs to a single Realm Collector on the same receiving port (ie. same stream defined in realm console). Suited for centralized deployment and management when all the firewalls export logs to the same host and port.
- Each firewall could be configured to send logs to a distinct port on the Realm Collector. This provides granular ingestion metrics per firewall.
Downloads
Collector binaries for all platforms, including Linux, are available from GitLab Releases.
The latest collector release is v0.137.0-rlm4.
Install on Windows
- Download the .exe https://gitlab.com/realm-security-public/collectors/-/releases
to a suitable temporary location, such as
C:\Users\Administrator\Downloads\realm-collector-amd64.exe
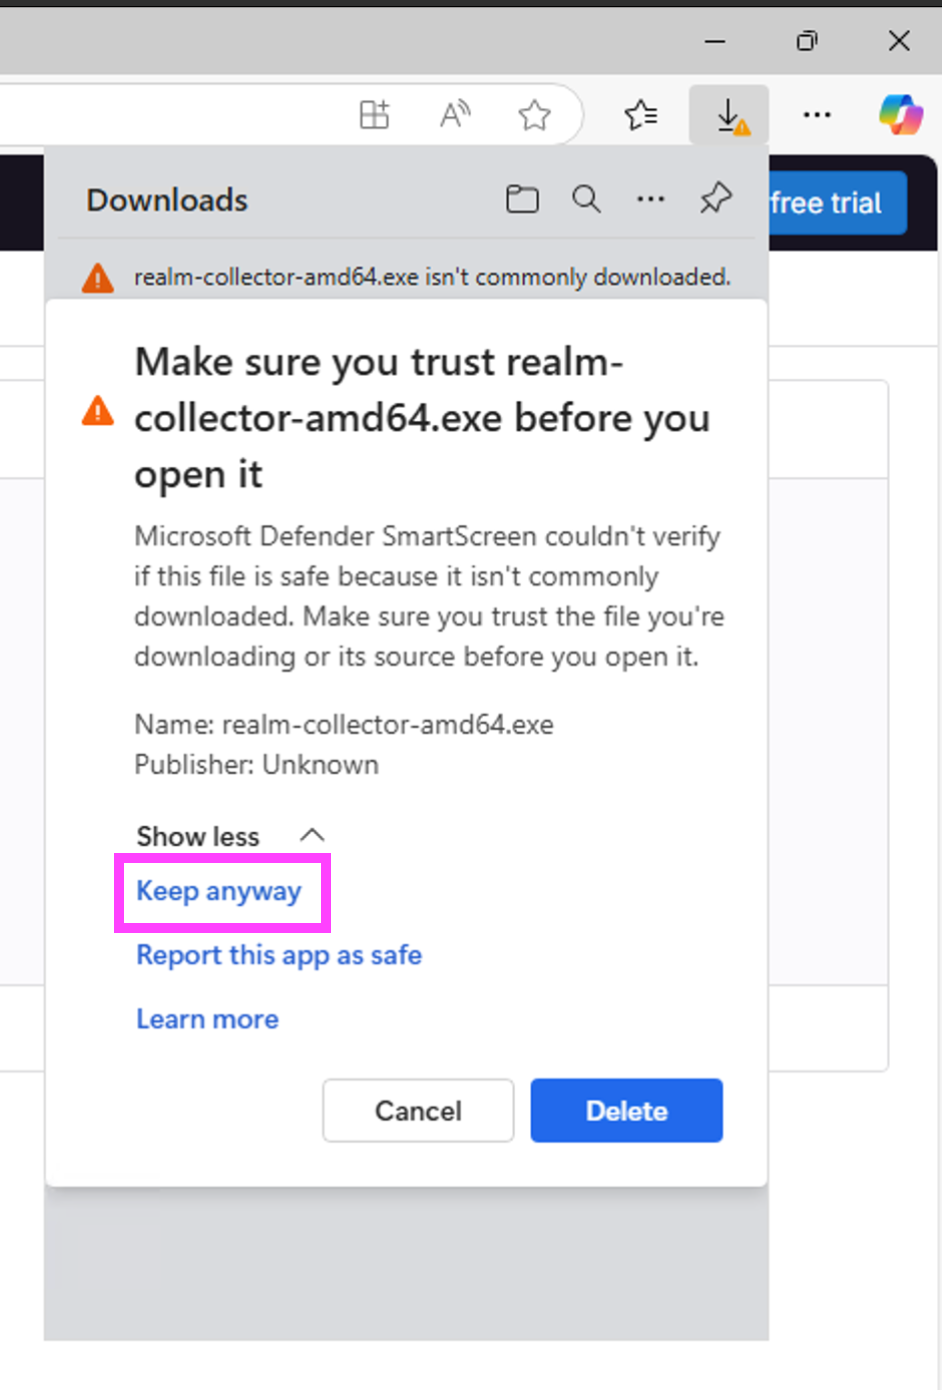
- Open an Administrative terminal
- Open Start menu, search for "Terminal" (called "Windows PowerShell" or "Command Prompt" on older versions)
- Right click and choose "Run as Administrator"
- Run the collector with the install token
cd Downloads
.\realm-collector-amd64.exe --config realm:<TOKEN>
At this point the collector is setup to run as a windows service.
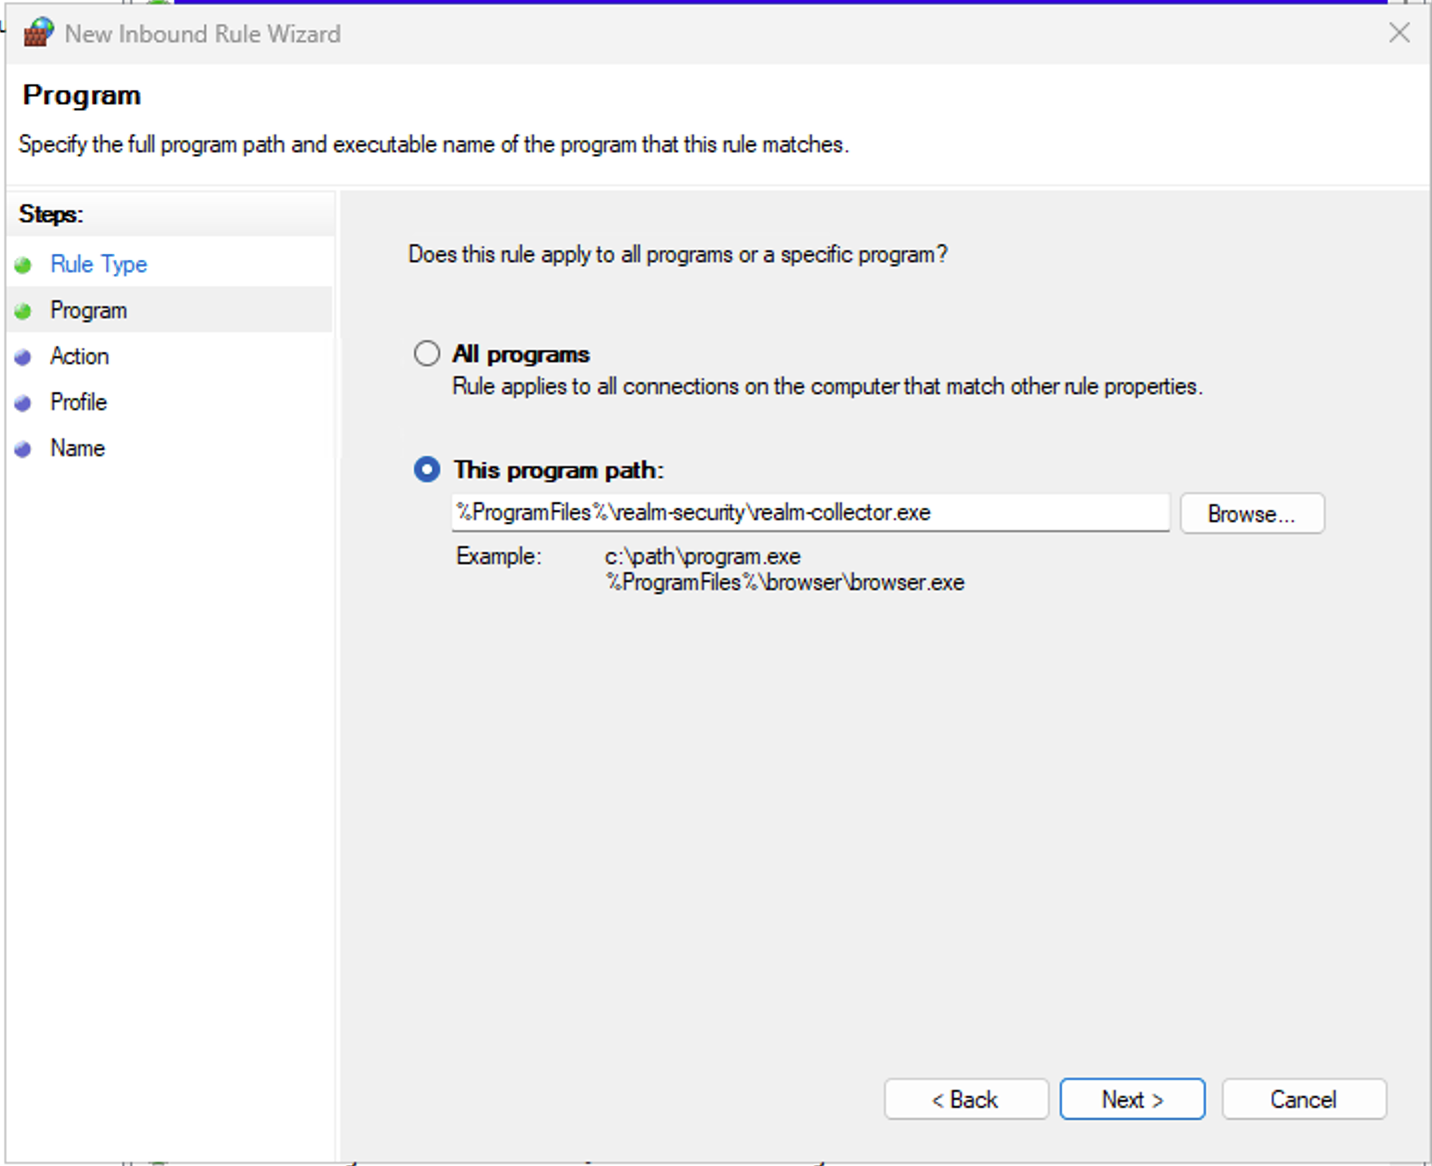
Update Host Firewall
- Open Windows Defender Firewall with Advanced Security
- Create an inbound “Program” rule
- Program:
%ProgramFiles%\realm-security\realm-collector.exe - Action: Allow the connection
- Profile: Domain / Private / Public
- Name: Realm Collector
- If using hardware firewall appliance, open the necessary ports to the VM
- Required inbound ports are configurable in the Realm console
- Each syslog endpoint requires a unique port on the VM
Install on Linux
Optional: You can configure the collector to store its data on a separately mounted volume when the root volume will not suffice for the collector buffer. Both configuration and buffer data will be stored on this mount. Look for "Dedicated Storage" callouts in the steps below.
Step 1. Create realm user
Create a realm user to run the collector service
shell
sudo adduser realmStep 2. Setup Dedicated Storage (Optional)
Set up the storage volume. Skip this step if not using dedicated storage.
a. Attach an additional EBS volume (or equivalent) to your VM and identify it
shell
lsblkb. Format the volume (skip if already formatted)
shell
sudo mkfs.ext4 /dev/<YOUR-DEVICE>c. Get the UUID and filesystem type
shell
sudo blkid /dev/<YOUR-DEVICE>d. Create the systemd mount unit
shell
sudo vim /etc/systemd/system/mnt-rlmcol.mounte. Copy the contents below into your new file
ini
[Unit]
Description=Mount Realm Collector Volume
After=local-fs.target

[Mount]
What=/dev/disk/by-uuid/<YOUR-UUID-HERE>
Where=/mnt/rlmcol
Type=ext4
Options=defaults,nofail

[Install]
WantedBy=multi-user.target
Note: Replace
<YOUR-UUID-HERE>with your volume's UUID from the previous step. Changeext4to your filesystem type if different.
f. Enable, verify the mount, and set ownership
shell
sudo systemctl daemon-reload && \
sudo systemctl enable --now mnt-rlmcol.mount && \
mount | grep rlmcol && \
sudo chown realm:realm /mnt/rlmcol
Step 3. Download collector binary
Download the latest Realm Collector binary to /usr/local/bin (v0.137.0-rlm4)
shell
curl https://gitlab.com/api/v4/projects/realm-security-public%2Fcollectors/packages/generic/realm-collector/v0.137.0-rlm4/realm-collector-linux-amd64 -o realm-collector && \
chmod 555 realm-collector && \
sudo chown realm:realm realm-collector && \
sudo mv realm-collector /usr/local/bin
Note: If you are using SELinux, run the following command after moving the binary:
shellsudo restorecon -v /usr/local/bin/realm-collector
Step 4. Verify the binary was copied correctly
shell
sudo /usr/local/bin/realm-collector --versionStep 5. Login as the realm user
shell
sudo su - realmStep 6. Configure collector
Bootstrap the collector with the install token Standard:
shell
/usr/local/bin/realm-collector --config realm:<YOUR_TOKEN_HERE>(Dedicated Storage) Use this command instead. Skip if not using dedicated storage.
shell
REALM_STORAGE_PATH=/mnt/rlmcol /usr/local/bin/realm-collector --config realm:<YOUR_TOKEN_HERE>Step 7. Verify collector output
If the collector install is successful, you should see output like this
text
Installing Realm Collector v0.137.0-rlm4
Finalizing install with server
Fetching collector configuration
Realm Collector installed successfully
Step 8. Test collector
Test the collector by starting it via CLI
shell
/usr/local/bin/realm-collector --config realm: --set=service.telemetry.logs.level=DEBUG 2>&1 | tee collector-debug.logIf the collector started successfully, you should see a log similar to this along with debug output
shell
info service@v0.126.0/service.go:289 Everything is ready. Begin running and processing data. {"resource": {}}Step 9. Stop the collector
Stop the collector using ctrl-c and follow the steps below to configure it to run as a service.
Run as a Service
Create a service for the collector (systemd). You must be logged in as root or a user with sudo permissions.
If you are logged in as the realm user, logout and login as root or a user with sudo permissions.
- Create a systemd service file
shell
sudo vim /etc/systemd/system/realm-collector.service- Copy the contents below into your new file
Note: Replace the
User=realmfield with the username of the user the collector service should run as.
Standard service file:
ini
[Unit]
Description=Realm Collector
After=network.target

[Service]
Type=simple
User=realm
ExecStart=/usr/local/bin/realm-collector --config realm:
Restart=always
RestartSec=1
# When healthy, the collector is quiet by design and logs
# very infrequently. Suppression can be helpful to avoid
# overwhelming journald in the event of a misconfigured
# integration causing errors receiving events.
LogRateLimitIntervalSec=1h
LogRateLimitBurst=100
# The following line can be commented out or deleted if
# all collector streams are configured with port > 1024.
AmbientCapabilities=CAP_NET_BIND_SERVICE

[Install]
WantedBy=multi-user.target
(Dedicated Storage) Add these two lines to the service file. Skip if not using dedicated storage.
- In the
[Unit]section, add:After=mnt-rlmcol.mount - In the
[Service]section, add:Environment="REALM_STORAGE_PATH=/mnt/rlmcol"
Example service file with dedicated storage:
ini
[Unit]
Description=Realm Collector
After=network.target
After=mnt-rlmcol.mount

[Service]
Type=simple
User=realm
ExecStart=/usr/local/bin/realm-collector --config realm:
Restart=always
RestartSec=1
# When healthy, the collector is quiet by design and logs
# very infrequently. Suppression can be helpful to avoid
# overwhelming journald in the event of a misconfigured
# integration causing errors receiving events.
LogRateLimitIntervalSec=1h
LogRateLimitBurst=100
# The following line can be commented out or deleted if
# all collector streams are configured with port > 1024.
AmbientCapabilities=CAP_NET_BIND_SERVICE
# Dedicated buffer storage mount
Environment="REALM_STORAGE_PATH=/mnt/rlmcol"

[Install]
WantedBy=multi-user.target- Reload systemd, enable and start the collector service
shell
sudo systemctl daemon-reload && \
sudo systemctl enable --now realm-collector- Verify the service is running
shell
systemctl status realm-collector

sudo systemctl show -pUser,UID realm-collector
Note: If you are running on Oracle SELinux, see the troubleshooting section below.
Migrating to Dedicated Storage
To add dedicated buffer storage to an existing collector installation:
- Stop the collector
shell
sudo systemctl stop realm-collectorSet up the storage volume by completing step 2 from "Install on Linux" above (substeps a-f)
Move existing data to the new mount
shell
sudo -u realm bash -c 'mv ~/.local/state/realmsec/* /mnt/rlmcol/'Note: If no data exists yet, skip this step.
- Update the service file
shell
sudo vim /etc/systemd/system/realm-collector.serviceAdd these two lines:
- In the
[Unit]section, add:After=mnt-rlmcol.mount - In the
[Service]section, add:Environment="REALM_STORAGE_PATH=/mnt/rlmcol"
- Restart the collector
shell
sudo systemctl daemon-reload && \
sudo systemctl restart realm-collector && \
systemctl status realm-collector
Update Host Firewall
You will need to open a firewall port for each collector stream.
Ubuntu ships with UFW by default, albeit in a disabled state.
sudo ufw status -> if Status: inactive, no action required. Otherwise:
Allow collector port (replace <PORT> with the collector stream port from Realm)
shell
sudo ufw allow <PORT>Oracle SE Linux ships with firewalld. Check if firewalld is running:
shell
systemctl status firewalldFind the zone that applies to your network interface. If you don't have a specific zone requirement, use public.
shell
sudo firewall-cmd --get-active-zonesReplace <ZONE> in the following commands with your zone, then replace <PORT> and <PROTOCOL> with the collector stream values from Realm.
shell
# Allow inbound traffic on the collector stream port (persistent)
sudo firewall-cmd --permanent --zone=<ZONE> --add-port=<PORT>/<PROTOCOL>

# Reload firewalld to apply the changes
sudo firewall-cmd --reload

# Verify the rule is active for that zone
sudo firewall-cmd --zone=<ZONE> --list-ports
Upgrading
- Replace the Realm Collector binary in
/usr/local/binwith the latest version (v0.137.0-rlm4)
shell
curl https://gitlab.com/api/v4/projects/realm-security-public%2Fcollectors/packages/generic/realm-collector/v0.137.0-rlm4/realm-collector-linux-amd64 -o realm-collector && \
chmod 555 realm-collector && \
sudo chown realm:realm realm-collector && \
sudo mv realm-collector /usr/local/bin
Note: If you are using SELinux, run the following command after moving the binary:
shellsudo restorecon -v /usr/local/bin/realm-collector
- Restart the systemd service
shell
systemctl restart realm-collector- Verify the service is up and running
shell
systemctl status realm-collectorTroubleshooting
Logs are not flowing through to the collector
- Confirm the source is configured to send data to the correct port and protocol.
- If the source logs confirm it is sending data, check whether the logs are reaching the VM either via wireshark or by running a TCP dump on the collector port:
shellsudo tcpdump -i any -nn -A port <PORT>- If the TCP dump shows no logs reaching the VM, a network firewall is likely blocking the traffic before it reaches the VM. Update the network firewall to allow the traffic for the configured port.
- If the TCP dump confirms the VM is receiving logs on the configured port and protocol, check the VM host firewall next: Windows host, Linux host.
- Once the logs are confirmed to be reaching the collector service but are still not appearing in Realm Cloud, verify that the collector VM can reach Realm Cloud on port 443.
- If outbound connectivity on port 443 is confirmed, check that logs are being exported in the format expected by the collector. The Realm integration guide for the product specifies the expected format, protocol, and framing trailer combination.
View OTel config
shell
sudo su - realm
cat ~/.local/state/realmsec/otelcol.yaml- View collector logs
shell
journalctl -u realm-collector | less- Export collector logs to a file
shell
journalctl -u realm-collector > collector.log- Error starting the collector service On Oracle linux, if you see the following error starting collector service,

shell
# view audit logs that might be preventing the collector binary from executing
journalctl -b | grep audit
The above audit logs indicates that the SELinux is blocking the binary. We need to add SELinux rule to allow the realm collector binary to execute.
shell
sudo audit2allow -w -a
yum install policycoreutils-python-utils audit
Restart the collector service to trigger the policy violations.
shell
# this should show several violations from realm-collector - if you see other stuff, STOP!
sudo systemctl restart realm-collector

# list recent audit violations (should be for realm-collector)
sudo audit2allow -w -a
# create a policy file to allow execution of collector binary
sudo audit2allow -a -M realm-collector
# load the new policy
sudo semodule -i realm-collector.pp

# refresh the path in SELinux
restorecon -R -v /usr/local/bin/realm-collector
Restart the collector service and check the status.
shell
sudo systemctl restart realm-collector
sudo systemctl status realm-collector- Uninstall collector
To uninstall the collector, login as the root user
Stop the collector service
shell
sudo systemctl stop realm-collector- Delete collector binary and cleanup state
shell
sudo rm /usr/local/bin/realm-collector
sudo rm -r /home/realm/.local/state/realmsec
Update log sources
Update the on-prem log sources (Firewall/DNS router/Switches etc) to send logs to the collector.
See Fortigate guide for configuring Fortigate firewall to send data to the collector.
See Palo Alto guide for configuring Palo Alto firewall to send data to the collector.