Appearance
Cortex XSIAM by Palo Alto Networks
Realm Security integrates seamlessly with Cortex XSIAM by Palo Alto Networks enabling intelligent routing and analysis of security event logs. Follow these steps to configure log forwarding to Cortex XSIAM from Realm Security Data Fabric.
Prerequisites
- Ensure you have administrative access to your Cortex XSIAM by Palo Alto Networks instance.
Data Source Setup
- Log in to the Cortex XSIAM by Palo Alto Networks web interface.
- Navigate to Settings > Data Sources.
- Click Add Data Source, search for
Custom - HTTP Base Collector, and click Add New Instance.
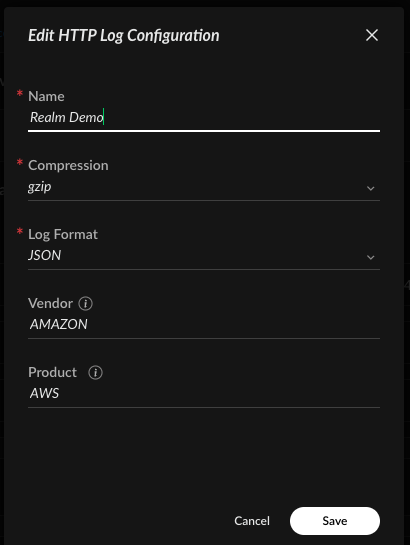
- It is generally preferred to set Vendor and Product fields. To find the correct values, go to the XSIAM and XSOAR marketplace, search for the product you want to ingest, and copy the values for Vendor and Product if specified. When forwarding data in CEF format, Vendor and Product can be inferred by Palo XSIAM.
- Fill in the form with the intended log format (either JSON or raw) and select gzip compression. Remember the log format you selected — it will be used when configuring the Cortex XSIAM output feed in the Realm Security console.
- Click Save and Generate Token. Copy the generated token value — it will be used when configuring the Cortex XSIAM output feed.
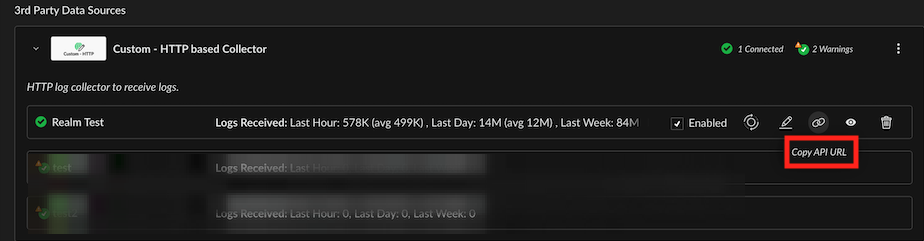
- After the Data Source has been created, select Copy API URL to retrieve the URL for the new data source. This will be used when configuring the Cortex XSIAM output feed.
Configuring Palo XSIAM Output Feed
- Go to Destinations and select a destination of type SIEM.
- Click Add Output Feed.
- Select type:
Cortex XSIAM by Palo Alto Networks. - Give the output feed a name and description of your choosing.
- Paste your Cortex XSIAM Data Source's API URL into the URL field.
- Paste your token into the Auth Token field.
- Select the format the Data Source is configured to receive.
- Click Add when the output feed configuration is complete.