Appearance
Abnormal Security Integration
Send Abnormal Security Threat Logs to Realm
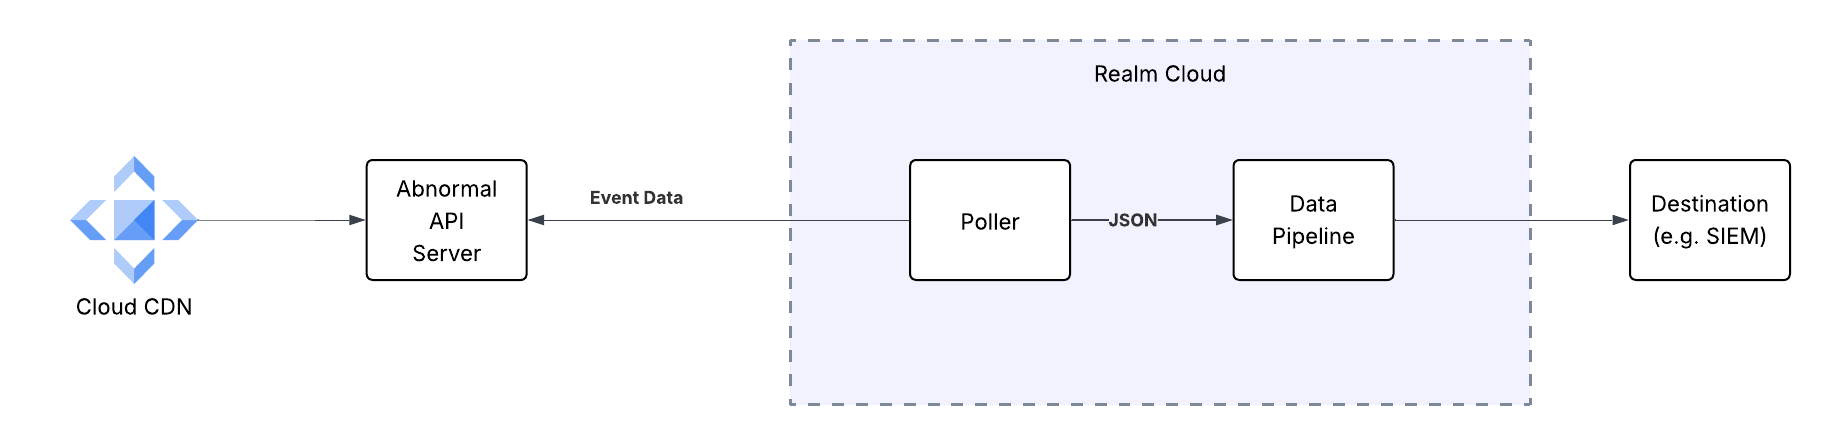
This guide walks you through connecting Abnormal Security to Realm. The integration uses a polling-based approach — Realm Cloud periodically queries the Abnormal Security API to retrieve threat and case data, then forwards it through your data pipeline to your configured destination.
WARNING: IP Allowlisting Required Before This Integration Will Work
Abnormal Security restricts API access by IP address. Realm's poller IPs must be added to your Abnormal Security allow list before any data can be collected. API calls from un-allowlisted IPs are silently rejected — the integration will appear to configure successfully in Realm but will return no data.
Contact Realm Support to obtain the current list of Realm Cloud IP addresses to allowlist.
Prerequisites
- An active Abnormal Security account with administrator access
- Access to the Realm Security console
- Realm IP addresses to add to your Abnormal Security token allow list (contact Realm Support for the current list)
Generate an API Token in Abnormal Security
- Log in to the Abnormal Security Portal.
- Navigate to Settings > Integrations.
- Select REST API from the list of available integrations.
- Set token scope to Tenant, and set Custom Access to
ReadorRead Sensitivefor each Abnormal Resource desired. - Before clicking Create Token, locate the IP Allowlist field to configure IP restrictions for this token.
- Click Add IP or similar to add Realm Cloud IP addresses to the token's allow list:
- Contact Realm Support and request the current list of Realm Cloud egress IP addresses if you do not have them
- Enter each Realm Cloud IP address in CIDR notation (e.g.,
10.0.0.1/32for a single IP) - Add all provided Realm IPs to the allow list
Note: Only API requests originating from allowlisted IP addresses will be permitted. If Realm IPs are not added to the token's allow list, all API requests from Realm will be silently rejected.
- Click Create Token to create the API token.
Important: Copy and save the API token immediately — you will not be able to view it again. You will need to enter this token in the Realm Security console.
- Note the Base URL displayed on the integrations page — this is the URL of the Abnormal Security API (e.g.,
https://api.abnormalsecurity.com). You will need this when configuring the integration in Realm.
Note: For more details on the Abnormal Security API, refer to the Abnormal Security API documentation.
Configure the Integration in Realm
- Create a new Source.
Name:
Abnormal Security
Format:Abnormal Security - Add a new Input feed.
Type:
Abnormal Security
API Token:<your Abnormal Security API token>
Base URL:<your Abnormal Security API URL>
Desired Resources:<the API resources to collect>
Once saved, the Realm poller will begin retrieving threat and case event data from the Abnormal Security API at regular intervals. The data is converted to JSON and forwarded through your data pipeline to your configured destination (e.g., SIEM).