Appearance
Panther SIEM Integration
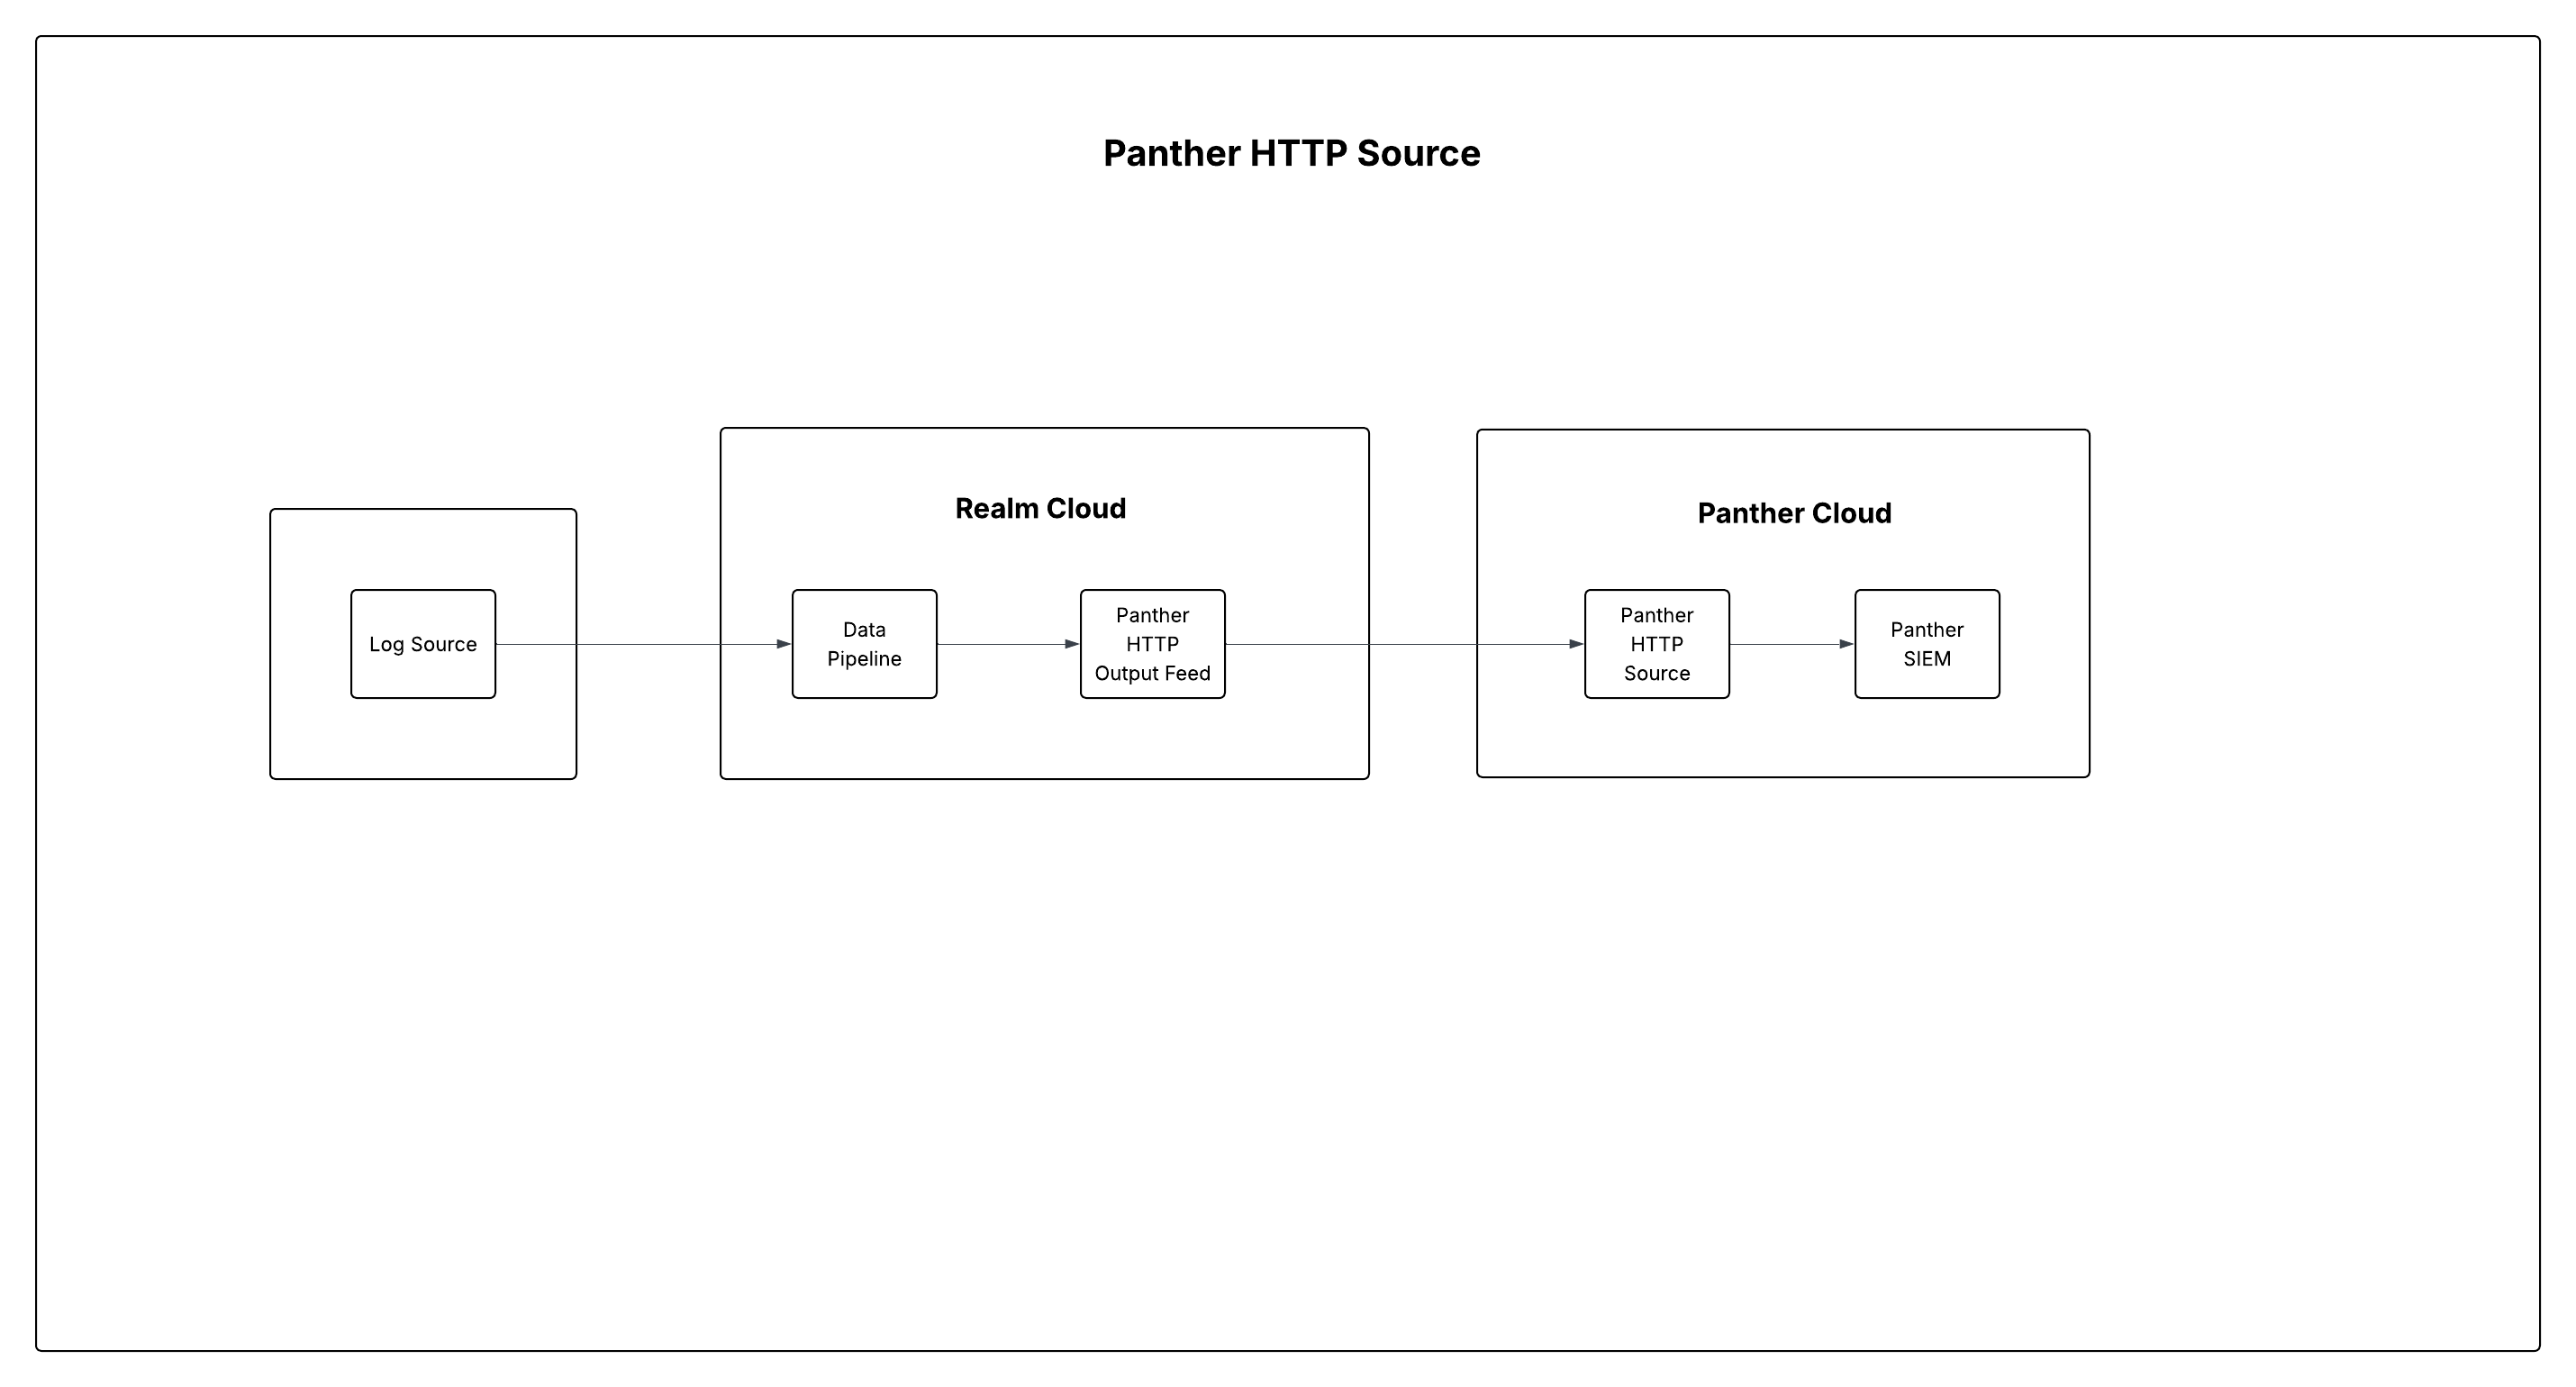
Send Logs to Panther SIEM
This guide walks you through connecting Realm to Panther as a destination. Realm forwards your log data to Panther using an HTTP log source, where Panther ingests, parses, and makes the data available for detection and investigation.
Note: If you prefer not to use an HTTP source — for example, for high-volume sources where the 1 MB payload limit may be a concern — Panther also supports ingestion via AWS S3 and Google Cloud Storage. In that case, configure an AWS S3 or GCS destination in Realm instead of the HTTP destination described below.
1. Create an HTTP Log Source in Panther
- Log in to the Panther Console.
- In the left-hand navigation bar, click Configure > Log Sources.
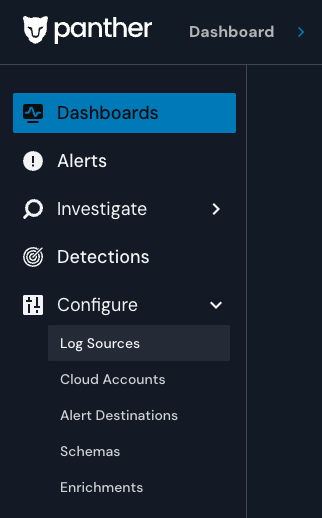
- In the upper-right corner, click Create New.
- Click the HTTP tile.

- In the Basic Information section, enter a Source Name (e.g.,
Realm.Security). - Optionally select one or more Schemas for the log types this source will ingest. You can also attach schemas after creation.
- In the Select Authentication Type section, choose Bearer from the Auth method dropdown.
- Enter a Bearer Token value.
Important: Store this token value securely — it will not be visible in the Panther Console after setup.
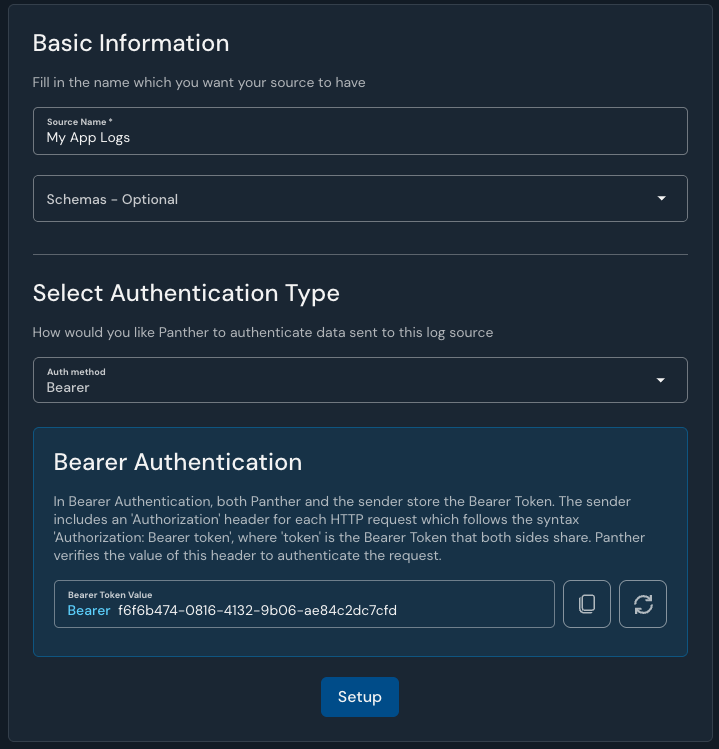
- Click Setup.
- On the success screen, copy the HTTP Source URL — Realm will send
POSTrequests to this endpoint. Endpoint creation may take a few minutes.
2. Configure the Panther Destination in Realm
- Navigate to the Destinations page in Realm and create a new destination for Panther.
- Add a new Output Feed and configure the following fields:
Name:
Panther
Method:HTTP
Endpoint:<your Panther HTTP Source URL>
Bearer Token:<your Panther Bearer Token>
Compression:GZIPorZSTD - Choose your preferred Compression format — Panther supports both GZIP and ZSTD compressed payloads.
- Save the Output Feed. Realm will begin forwarding log data to your Panther HTTP source.
Note: For more information on Panther HTTP sources, refer to the Panther HTTP Source documentation.
3. Send Logs to Panther via AWS S3
With this method, Realm writes log data as compressed objects into an S3 bucket in your own AWS account. That bucket notifies Panther (via SNS/SQS) whenever new objects arrive, and Panther pulls and processes them from there. This avoids the HTTP method's 1 MB payload limit and is generally preferred for high-volume sources.
Note: If you're a Panther Cloud Connected customer, create this S3 bucket in a separate AWS account from the one your Panther deployment resides in.
3.1 Create the S3 Bucket
- Go to S3 > Buckets.
- Click Create bucket.
- Enter the bucket name:
Bucket name:
rlm-demo-output - Click Create bucket.
- Copy the bucket name — you will need it for both the Panther and Realm configuration steps below.
Note: Versioning is disabled by default.
3.2 Create an S3 Log Source in Panther
- In the Panther Console, go to Log Sources > Create New.
- Click the AWS S3 Bucket tile.
- Fill in:
Name: A descriptive name (e.g.,
Realm Security)
AWS Account ID: The 12-digit account ID where your bucket lives
Bucket Name: The bucket from Step 3.1
KMS Key ARN (optional): Only if the bucket uses KMS-SSE encryption - Optionally configure prefixes/schemas, then click Setup.
- On the Create IAM Role page, choose an option:
- Using the AWS Console UI — recommended if this is your first Panther S3 source. Panther launches a CloudFormation stack for you; copy the resulting Role ARN back into Panther.
- CloudFormation or Terraform File — download Panther's provided template, deploy it in your own IaC pipeline, and provide the resulting Role ARN.
- I want to set up everything on my own — create the IAM role and trust policy manually. If you choose this option, you must also complete Step 3.3 below, since Panther can't auto-configure bucket notifications without the CloudFormation-managed role.
- Click Setup, then confirm no permission errors are shown.
- Attach a schema to the source (or configure custom schema inference later).
This IAM role is what lets Panther read from the bucket — it's separate from the credentials Realm uses to write to it, configured in Step 3.4 below.
3.3 Configure Bucket Notifications (Manual IAM Setup Only)
Skip this step if you used the CloudFormation/Console UI option above — it's handled for you. If you set up the IAM role manually, you need to wire up notifications yourself:
- Create (or reuse) an SNS topic in the same region as your bucket, subscribed to Panther's input data queue. Panther's own S3 source documentation has the full CloudFormation template and manual steps for this — the short version: create the topic, grant Panther's account
sns:Subscribeon it, and subscribe it to Panther'spanther-input-data-notifications-queueSQS queue (with raw message delivery disabled). - On the bucket itself, go to Properties > Event notifications > Create event notification:
Event name:
PantherEventNotifications
Event types:All object create events
Destination: SNS topic → the topic from the previous step
3.4 Grant Realm Write Access to the Bucket
Create the IAM Policy
- Go to IAM > Policies.
- Click Create policy.
- Click JSON and replace the contents with the following, substituting
<BUCKET_NAME>with the bucket name from Step 3.1:
json
{
    "Version": "2012-10-17",
    "Statement": [
        {
            "Sid": "S3WriteRealmBucket",
            "Effect": "Allow",
            "Action": [
                "s3:PutObject",
                "s3:ListBucket",
                "s3:PutObjectAcl"
            ],
            "Resource": [
                "arn:aws:s3:::<BUCKET_NAME>",
                "arn:aws:s3:::<BUCKET_NAME>/*"
            ]
        }
    ]
}- Click Next.
- Enter the policy details:
Name:
rlm-s3-output-write
Description: Grant Realm write access to the S3 output bucket. - Click Create policy.
Create the IAM User
- Go to IAM > Users and click Create user.
- Enter the username:
Name:
<tenant_name>-realm.security-s3-output - Click Next.
- Select Attach policies directly.
- Search for and select the
rlm-s3-output-writepolicy created above. - Click Next, then Create user.
- Open the user that was just created.
- Go to Security credentials and click Create access key.
- Select Third-party service, check the confirmation checkbox, then click Next.
- Enter a description:
Allows <tenant_name> to write to <bucket_name> S3 bucket - Click Create access key.
- Copy and save the Access Key and Secret access key — you will need these in the next step.
3.5 Configure the S3 Destination in Realm
- Navigate to the Destinations page in Realm and create a new destination for Panther.
- Under Destinations, select Add New Destination and connect the relevant log source(s) you want delivered to Panther.
- Go to Output Feeds > Add Output Feed, choose the S3 output feed type, and configure:
Name:
Panther (S3)
Bucket Name: The bucket from Step 3.1
Access Key / Secret Access Key: From Step 3.4
Key Prefix (optional): See below
Format:RAWorJSON - Save the Output Feed.
Output File Structure
By default, data is stored in the following path structure:
s3://{bucket_name}/{destination_name}/{source_name}/YYYY/MM/DD/*.log.gzTo use a custom prefix, set Key Prefix on the output feed. For example, foo produces:
s3://{bucket_name}/foo/*.log.gzYou can include date components using %Y, %m, and %d:
| Key Prefix | Resulting path |
|---|---|
foo/year=%Y/month=%m/day=%d/ | s3://{bucket_name}/foo/year=2025/month=10/day=23/ |
foo/%Y/%m/%d/ | s3://{bucket_name}/foo/2025/10/23/ |
Each file is compressed with zstd and contains newline-delimited events.
Note: If you set a Key Prefix here, and Panther's S3 source (Step 3.2) was configured with a matching or wildcard prefix filter, double check the two agree — otherwise Panther's ingestion won't see the objects Realm writes. Also confirm the IAM role granted to Panther in Step 3.2 can actually read objects at this path (
s3:GetObjectonarn:aws:s3:::<BUCKET_NAME>/<your-prefix>/*), since Realm's write access (Step 3.4) and Panther's read access (Step 3.2) are configured as two entirely separate IAM principals against the same bucket.
4. Send Logs to Panther via Google Cloud Storage
This method works the same way as S3, but uses a GCS bucket and Pub/Sub notifications instead of S3 and SNS/SQS. Realm writes log objects into a GCS bucket in your own GCP project; Panther is notified of new objects via a Pub/Sub subscription and pulls them from there.
4.1 Create the GCS Bucket
- Log in to the GCS console.
- Navigate to Cloud Storage > Buckets > Create Bucket.
- Enter a name for the bucket, for example:
Realm-Archive. - Select Standard storage.
- Click Create.
- Review the bucket configuration.
4.2 Set Up Pub/Sub Notifications
- Create a Pub/Sub topic for bucket notifications:
gcloud pubsub topics create $TOPIC_ID - Configure the bucket to publish
OBJECT_FINALIZEevents to that topic:gsutil notification create -t $TOPIC_NAME -e OBJECT_FINALIZE -f json gs://$BUCKET_NAME - Create a subscription on that topic for Panther to consume from. This subscription must be dedicated to Panther — don't share it with any other service:
gcloud pubsub subscriptions create $SUBSCRIPTION_ID --topic $TOPIC_ID --topic-project $PROJECT_ID
4.3 Create a GCS Log Source in Panther
- In the Panther Console, go to Log Sources > Create New, then click the Google Cloud Storage tile.
- Fill in a Name, and optionally configure prefixes/schemas, then click Setup.
- On the Log Format page, select the stream type of the incoming logs (Auto, Lines, JSON, or JSON Array), then click Continue.
- Choose an authentication method and follow Panther's setup for that path:
- Service account: enable the IAM API, create a service account, grant it
roles/storage.objectVieweron the bucket androles/pubsub.subscriber+roles/pubsub.vieweron the subscription from Step 4.2, then generate and download a JSON key file for it. - Workload Identity Federation: avoids a long-lived key file, at the cost of more setup — see Panther's GCS source documentation for the full attribute-mapping and trust configuration.
- Service account: enable the IAM API, create a service account, grant it
- Back in Panther, upload the JSON key file (or credential configuration file, if using Workload Identity Federation) and provide the GCS Bucket Name and Pub/Sub Subscription ID from Step 4.2.
- Click Setup, then attach a schema to the source.
This service account is what lets Panther read from the bucket — it's a completely separate identity from the one Realm uses to write to it, created next.
4.4 Create a Service Account for Realm to Write With
Note: Realm does not support the legacy P12 secret — ensure you create a JSON GCP Service Account Key.
- Go to IAM > Service Accounts.
- Click Create Service Account.
- Enter a name for the service account:
Name:
realm-archive-account - Click Create and Continue.
- Grant permission to write to the bucket:
- Add role > Cloud Storage > Storage Object Creator
- Add an IAM condition to restrict access to just this one bucket:
text
resource.service == "storage.googleapis.com" &&
resource.name.startsWith("projects/_/buckets/REPLACE_WITH_BUCKET_NAME")- Select the service account.
- Go to Keys > Create Key > JSON.
- Click Create. The service account key downloads to your local machine. Open it in a text editor, select all contents, and copy to clipboard — you'll paste this directly into Realm in the next step.
4.5 Configure the GCS Destination in Realm
- Navigate to Destinations > Add Destination.
Name:
Archive
Type:Data Lake - Under Destinations, select Add New Source and connect the relevant log source(s) you want delivered to Panther.
- Go to Output Feeds > Add Output Feed, choose the GCS output feed type, and configure:
Name:
GCS Archive
Bucket Name: The bucket from Step 4.1
Service Account Key: Paste the JSON key copied in Step 4.4
Note: As with S3, the credentials Realm uses to write (Step 4.4) and the credentials you gave Panther to read (Step 4.3) are two different service accounts scoped to two different, non-overlapping permission sets, even though both point at the same bucket.