Appearance
Snowflake (Snowpipe) Integration
Realm Security sends data to Snowflake with Snowpipe. Realm writes files to a cloud storage location that you own. Snowpipe then loads each new file into a Snowflake table.
How Snowpipe Ingestion Works
This integration uses Snowpipe automated loading, also called auto-ingest. Every storage backend uses the same flow:
- A Realm output feed writes files in the Data Lake format to a folder (prefix) in your cloud storage.
- The cloud storage service publishes an event about each new file to a message service. The message service delivers the event to a queue that Snowflake reads. The event contains the file path, not the data.
- Snowflake compares the file path with the location of each pipe that uses the queue. A pipe's location is the URL of its external stage.
- The pipe reads the file through the stage and loads the rows into the table with its
COPY INTOstatement. Snowpipe records each loaded file, so it does not load the same file twice.
A Snowflake storage integration gives the stage read access to your storage. With a storage integration, you do not store cloud credentials in Snowflake.
You create these Snowflake objects:
| Object | Shared by all storage backends | Purpose |
|---|---|---|
| Table | Yes | Holds the loaded events |
| File format | Yes | Tells Snowflake how to read the Data Lake files |
| Storage integration | No | Gives Snowflake read access to your storage |
| External stage | No | Points to the folder that Realm writes to |
| Pipe | No | Loads new files from the stage into the table |
| Notification integration | Only for Google Cloud Storage and Azure | Connects the pipe to a queue that you create. Amazon S3 does not need one, because Snowflake creates the queue. |
Note: Each pipe loads every file in its location. If two pipes have overlapping locations, for example
s3://<bucket>/realm/ands3://<bucket>/realm/okta/, both pipes load the same files. If both pipes load the same table, the table gets duplicate rows.
Realm supports these storage backends for Snowpipe:
| Storage backend | Realm output feed | How Snowflake learns about new files |
|---|---|---|
| Amazon S3 | AWS S3 | S3 event notification to an SQS queue that Snowflake manages |
Prerequisites
- Access to the Realm Security console
- A Snowflake role with the
CREATE INTEGRATIONprivilege on the account. By default, onlyACCOUNTADMINhas this privilege.
Each storage backend section lists its own additional prerequisites.
Create the Table and File Format
Do this once, before you set up a storage backend. All storage backends load into the same table and use the same file format. Run the following statements. Replace <database> and <schema> with your own values.
sql
USE ROLE ACCOUNTADMIN;
USE SCHEMA <database>.<schema>;

CREATE TABLE REALM_EVENTS (
  RAW            STRING,
  PARSED         VARIANT,
  OBSERVABLES    VARIANT,
  REALM_METADATA VARIANT,
  ENRICHMENTS    VARIANT
);

CREATE FILE FORMAT REALM_DATA_LAKE_JSON
  TYPE = JSON
COMPRESSION = AUTO;- The table has one column for each top-level key of the Realm Data Lake format.
COMPRESSION = AUTOdetects the compression of each file. Realm compresses files withgzipby default.
The table columns hold the following data. For the full Data Lake format, see Data Lake Format.
| Column | Type | Content |
|---|---|---|
RAW | STRING | The original log line, as Realm received it |
PARSED | VARIANT | The parsed event, as a JSON object |
OBSERVABLES | VARIANT | Observables that Realm extracted from the event, grouped by type |
REALM_METADATA | VARIANT | Realm source, feed, destination, and timestamp metadata |
ENRICHMENTS | VARIANT | Enrichment records. NULL when enrichments are not enabled for the output feed. |
Snowpipe via Amazon S3
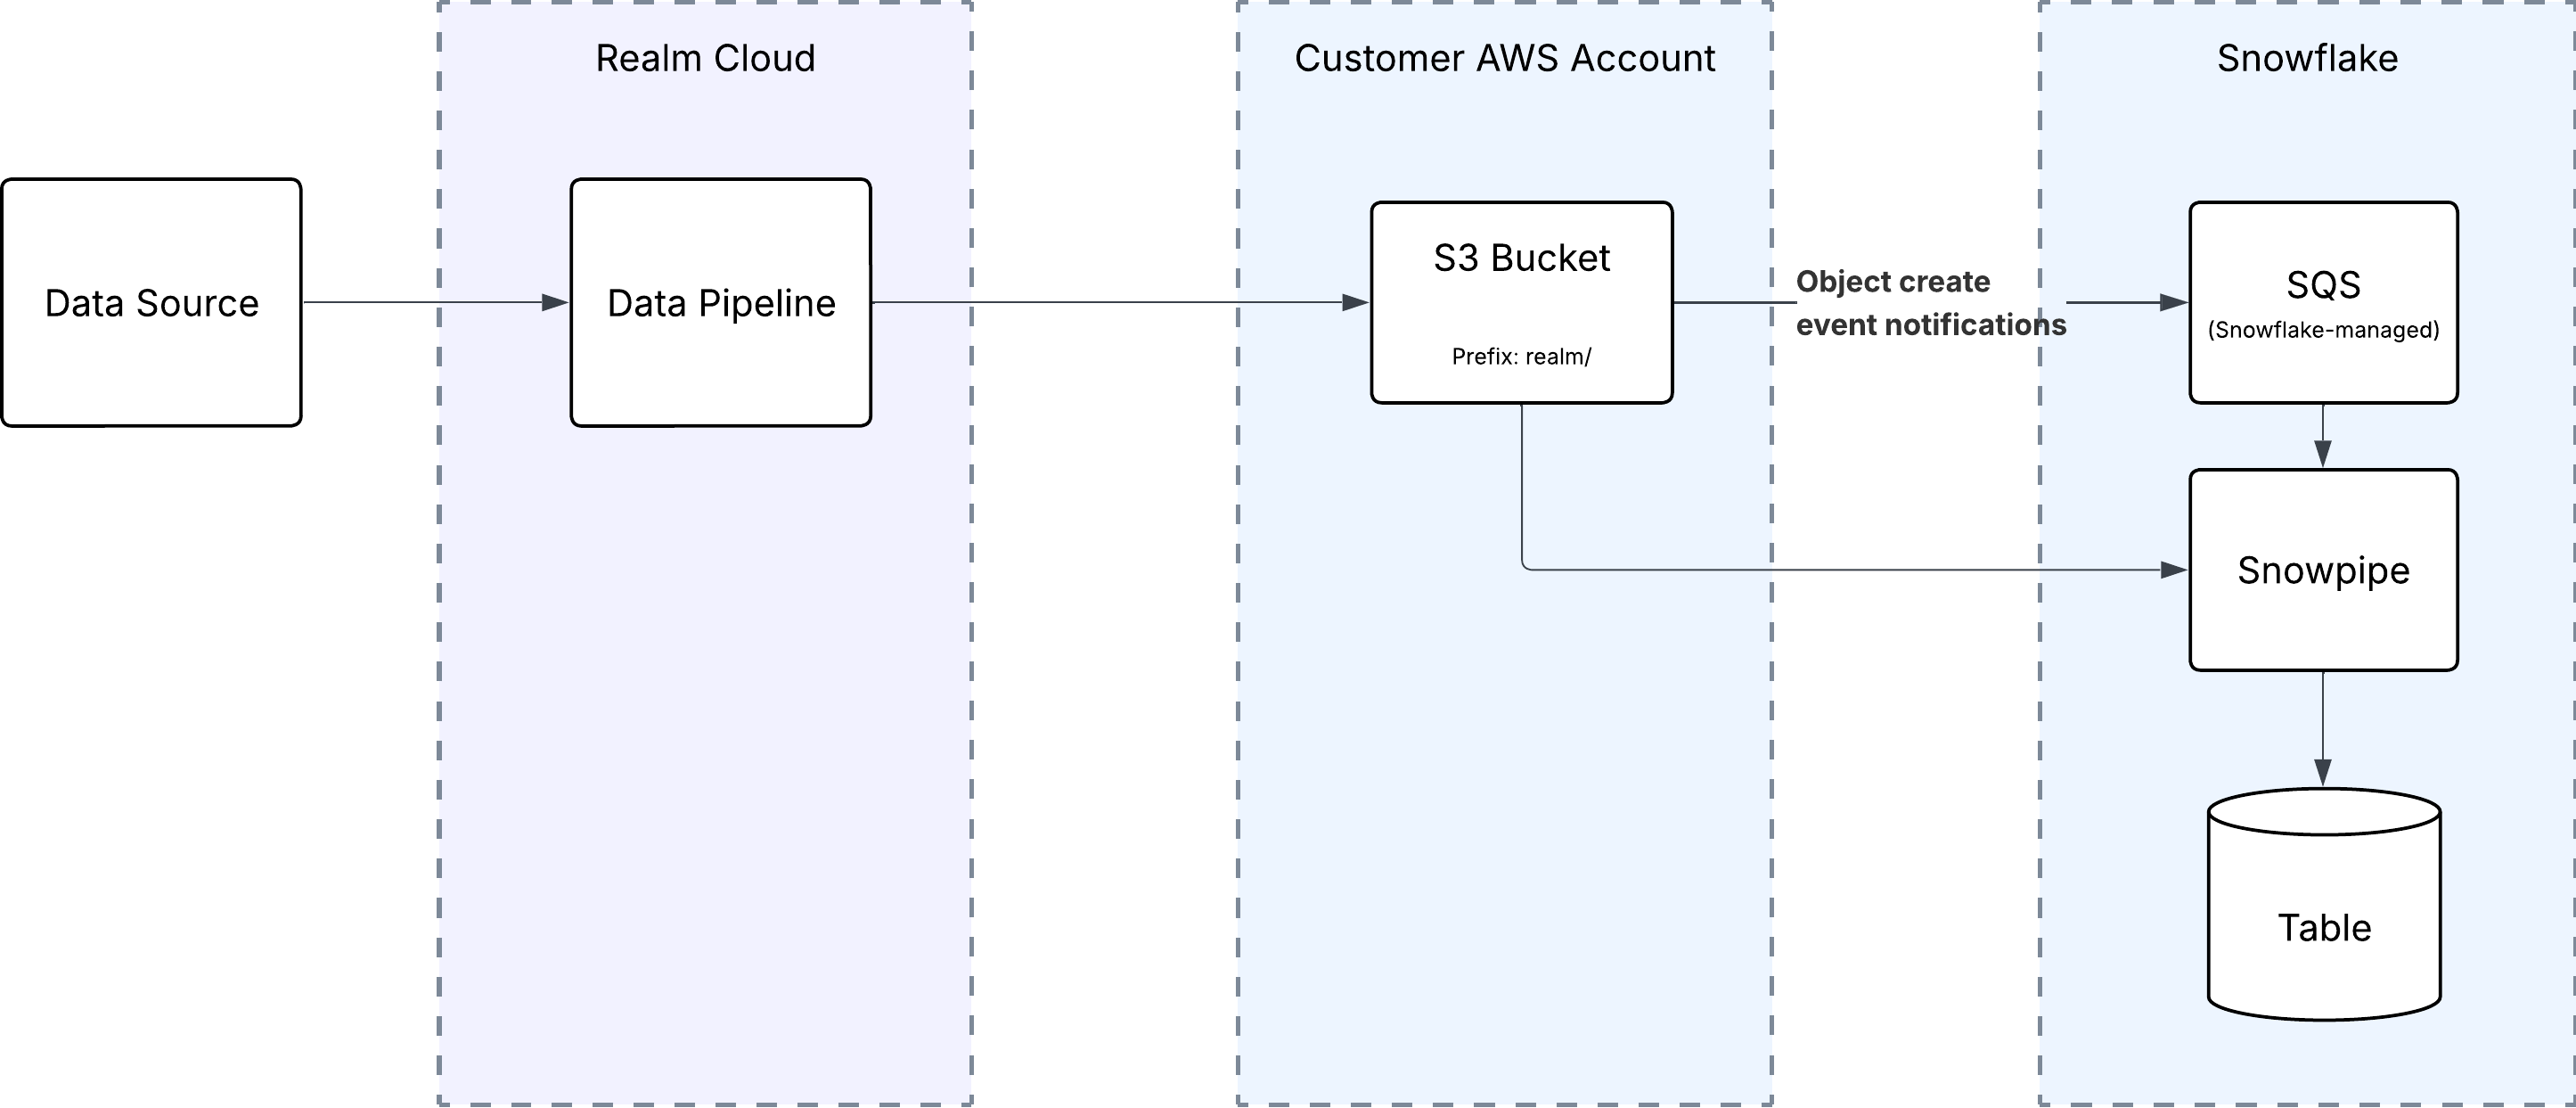
The Realm AWS S3 output feed writes files to a prefix in your bucket. Amazon S3 sends an event notification to an SQS queue that Snowflake manages, and Snowpipe loads the file into the table.
Amazon S3 Prerequisites
In addition to the general prerequisites, you need:
- An AWS account with permission to create S3 buckets, IAM policies, IAM users, and IAM roles, and to configure event notifications on a bucket
- The table and file format from Create the Table and File Format
Your Snowflake account can be on any cloud platform. Snowpipe cannot load from a bucket in an AWS government region when your Snowflake account is in a commercial region, or the reverse.
Note: The examples in this section use the bucket prefix
realm/. You can use a different prefix. If you do, use the same prefix in every step, and always end it with a forward slash (/).
Step 1: Create the S3 Bucket
If your Snowflake account is on AWS, put the bucket in the same AWS region as your Snowflake account. A bucket in a different region or on a different cloud works, but the cloud provider can charge data transfer fees when Snowpipe reads files. To find the region of your Snowflake account, run SELECT CURRENT_REGION(); in Snowflake. A result of AWS_US_EAST_1 is the AWS region us-east-1.
- In the AWS console, go to S3 > Buckets and click Create bucket.
- Enter the bucket details:
Bucket name:
<bucket>
AWS Region:<your Snowflake account's region> - Keep Object Ownership set to ACLs disabled (recommended). Then the bucket owner owns every file that Realm writes, and the Snowflake IAM role in Step 3 can read the files.
- Keep Block all public access turned on.
- Click Create bucket.
Note: If you set Default encryption to SSE-KMS, both AWS identities need permission to use the KMS key. Add
kms:GenerateDataKeyto the Realm IAM user policy in Step 2, andkms:Decryptto the Snowflake IAM role policy in Step 3. The default, SSE-S3, needs no extra permission.
Step 2: Create an IAM User for Realm
Realm writes files to the bucket with an AWS access key. This IAM user can only write to the realm/ prefix.
Go to IAM > Policies and click Create policy.
Click JSON and replace the contents with the following policy. Replace
<bucket>with the bucket name from Step 1.json{ "Version": "2012-10-17", "Statement": [ { "Sid": "RealmWriteObjects", "Effect": "Allow", "Action": "s3:PutObject", "Resource": "arn:aws:s3:::<bucket>/realm/*" }, { "Sid": "RealmHealthCheck", "Effect": "Allow", "Action": "s3:ListBucket", "Resource": "arn:aws:s3:::<bucket>" } ] }Click Next and enter the policy details:
Name:
rlm-snowpipe-write
Description: Grant Realm write access to the Snowpipe prefix.Click Create policy.
Go to IAM > Users and click Create user.
User name:
<tenant_name>-realm.security-snowpipeReplace
<tenant_name>with a short name for your organization, for exampleacme.Do not give the user console access. Click Next.
Select Attach policies directly, select the
rlm-snowpipe-writepolicy, and click Next.Click Create user.
Open the new user, go to Security credentials, and click Create access key.
Select Third-party service, select the confirmation checkbox, and click Next.
Click Create access key.
Copy the Access key and the Secret access key. You need them in Step 7.
Important: Copy and save the Secret access key immediately. AWS does not show it again.
The s3:ListBucket permission is for the Realm health check of the bucket.
Step 3: Create an IAM Policy and Role for Snowflake
Snowflake reads the bucket through an IAM role. These steps follow Configure a Snowflake storage integration to access Amazon S3.
If your Snowflake account is on AWS, go to IAM > Account settings. Under Security Token Service (STS), find the region of your Snowflake account. If its status is Inactive, set it to Active.
Go to IAM > Policies and click Create policy.
Click JSON and replace the contents with the following read-only policy. Replace
<bucket>with your bucket name.json{ "Version": "2012-10-17", "Statement": [ { "Effect": "Allow", "Action": ["s3:GetObject", "s3:GetObjectVersion"], "Resource": "arn:aws:s3:::<bucket>/realm/*" }, { "Effect": "Allow", "Action": ["s3:ListBucket", "s3:GetBucketLocation"], "Resource": "arn:aws:s3:::<bucket>", "Condition": { "StringLike": { "s3:prefix": ["realm/*"] } } } ] }Click Next, name the policy
snowflake-snowpipe-read, and click Create policy.Go to IAM > Roles and click Create role.
Select AWS account, then select Another AWS account.
In Account ID, enter your own AWS account ID. This is a temporary value.
Select Require external ID and enter
0000. This is also a temporary value.Click Next, select the
snowflake-snowpipe-readpolicy, and click Next.Name the role
snowflake-snowpipe-roleand click Create role.Open the role and copy its ARN. It has the form
arn:aws:iam::<account-id>:role/snowflake-snowpipe-role.
You replace the two temporary values in Step 4, after Snowflake gives you its IAM user ARN and external ID.
Step 4: Create the Storage Integration
In Snowflake, open a SQL worksheet with the
ACCOUNTADMINrole, or another role with theCREATE INTEGRATIONprivilege.Run the following statements. Replace
<role-arn>with the role ARN from Step 3 and<bucket>with your bucket name.sqlUSE ROLE ACCOUNTADMIN; CREATE STORAGE INTEGRATION REALM_S3_INT TYPE = EXTERNAL_STAGE STORAGE_PROVIDER = 'S3' ENABLED = TRUE STORAGE_AWS_ROLE_ARN = '<role-arn>' STORAGE_ALLOWED_LOCATIONS = ('s3://<bucket>/realm/'); DESC INTEGRATION REALM_S3_INT;From the
DESC INTEGRATIONoutput, copy the values ofSTORAGE_AWS_IAM_USER_ARNandSTORAGE_AWS_EXTERNAL_ID.In the AWS console, go to IAM > Roles and open
snowflake-snowpipe-role.Go to Trust relationships and click Edit trust policy.
Replace the policy with the following. Use the two values from the
DESC INTEGRATIONoutput.json{ "Version": "2012-10-17", "Statement": [ { "Effect": "Allow", "Principal": { "AWS": "<STORAGE_AWS_IAM_USER_ARN>" }, "Action": "sts:AssumeRole", "Condition": { "StringEquals": { "sts:ExternalId": "<STORAGE_AWS_EXTERNAL_ID>" } } } ] }Click Update policy.
Important: Do not run
CREATE OR REPLACEon this storage integration later. A new integration gets a new external ID, and the trust policy then no longer matches. To change the integration, useALTER STORAGE INTEGRATION.
Step 5: Create the Stage and Pipe
Note: This example uses
ACCOUNTADMINto create the pipe. Snowflake recommends a separate role that owns the pipe and has only the privileges the pipe needs. See Create a role to own the pipe.
Create the stage in the schema that has the
REALM_EVENTStable. The stage uses theREALM_DATA_LAKE_JSONfile format from Create the Table and File Format. Replace<database>,<schema>, and<bucket>with your own values.sqlUSE ROLE ACCOUNTADMIN; USE SCHEMA <database>.<schema>; CREATE STAGE REALM_S3_STAGE URL = 's3://<bucket>/realm/' STORAGE_INTEGRATION = REALM_S3_INT FILE_FORMAT = REALM_DATA_LAKE_JSON;Check that Snowflake can read the bucket through the storage integration and the trust policy. Run the following statement.
sqlLIST @REALM_S3_STAGE;An empty result is correct, because the prefix has no files yet. If the command returns an access error, check the trust policy from Step 4, or run
SYSTEM$VALIDATE_STORAGE_INTEGRATION.Set up automatic loading. The pipe loads each new file in the stage into the
REALM_EVENTStable. Run the following statement.sqlCREATE PIPE REALM_S3_PIPE AUTO_INGEST = TRUE AS COPY INTO REALM_EVENTS (RAW, PARSED, OBSERVABLES, REALM_METADATA, ENRICHMENTS) FROM ( SELECT $1:raw::STRING, $1:parsed, $1:observables, $1:realm_metadata, $1:enrichments FROM @REALM_S3_STAGE );Get the ARN of the SQS queue that Snowflake manages for the pipe. You need it in Step 6. Run the following statement, and copy the value of the
notification_channelcolumn.sqlDESC PIPE REALM_S3_PIPE;The value has the form
arn:aws:sqs:<region>:<account-id>:sf-snowpipe-....
Step 6: Configure the S3 Event Notification
- In the AWS console, go to S3 > Buckets and open your bucket.
- Go to Properties > Event notifications and click Create event notification.
- Enter the notification details:
Event name:
snowpipe-realm
Prefix:realm/ - Leave Suffix empty. Realm adds a compression extension to the file names, so a suffix filter can miss files.
- Under Event types, select All object create events.
- Under Destination, select SQS queue, then select Enter SQS queue ARN.
- Paste the
notification_channelvalue from Step 5. - Click Save changes.
Snowflake owns the SQS queue, in Snowflake's AWS account. You do not change any permissions on the queue.
Note: If S3 reports that the notification overlaps an existing one, another notification on the bucket already sends object-create events for the same prefix. Open that notification and check its destination:
- The same SQS queue ARN that
DESC PIPEreturned. You do not need a second notification. Skip the rest of this step.- An Amazon SNS topic. Use that topic. Drop the pipe, then create it again with
AWS_SNS_TOPICset to the topic ARN. Follow Option 2 in Automating Snowpipe for Amazon S3.- Any other destination, for example an application's SQS queue or a Lambda function. Send the events through a new Amazon SNS topic, and subscribe the existing destination to it. Then drop the pipe and create it again with
AWS_SNS_TOPIC, as in Option 2.You cannot add
AWS_SNS_TOPICto an existing pipe withALTER PIPE, so you must create the pipe again.
Step 7: Create the Destination in Realm
- In the Realm console, navigate to Destinations and click Add Destination.
Name:
Snowflake
Type:Data Lake - Click Add Output Feed and select AWS S3 as the method.
- Fill in the following fields:
Name:
Snowflake (Snowpipe) S3
Bucket Name:<bucket>
AWS Region:<bucket region, e.g. us-east-1>
AWS Access Key ID:<Access key from Step 2>
AWS Secret Access Key:<Secret access key from Step 2>
Key Prefix:realm/
Format:Data Lake - Click Add.
- Connect the destination to the log sources that you want to send to Snowflake.
Important: Set Key Prefix to a value that starts with
realm/and ends with/. Realm puts the Key Prefix directly in front of each file name and adds no/between them. For example:
realm/writesrealm/1761657600-<id>.log.gz. This is correct.realmwritesrealm1761657600-<id>.log.gzat the top of the bucket.- An empty Key Prefix writes to the default path,
<destination name>/<source name>/YYYY/MM/DD/.In the last two cases, the file is outside
realm/. The IAM user from Step 2 can write only underrealm/, so the write fails with an access error, and no data reaches Snowflake.
Troubleshooting
Snowpipe usually loads a file within one minute after the storage sends the event.
Note: Snowpipe does not need a warehouse, but the queries in this section do. Select a warehouse in your worksheet before you run them.
To check that data arrives, run:
sql
SELECT RAW,
       REALM_METADATA:source::STRING          AS SOURCE,
       REALM_METADATA:source_type::STRING     AS SOURCE_TYPE,
       REALM_METADATA:event_timestamp::TIMESTAMP_TZ AS EVENT_TIME
FROM REALM_EVENTS
ORDER BY EVENT_TIME DESC
LIMIT 10;
No Rows Arrive in the Table
Check the status of the pipe for your storage backend, for example REALM_S3_PIPE:
sql
SELECT SYSTEM$PIPE_STATUS('<pipe name>');lastReceivedMessageTimestampis missing or old. No event notifications reach the queue. Do the checks for your storage backend below. This field shows the last notification on the queue for any pipe that uses it.lastReceivedMessageTimestampis recent, butlastForwardedMessageTimestampis missing or old. Notifications reach the queue, but none of them are for files in this pipe's location. The Key Prefix on the output feed probably does not match the stage URL.lastForwardedMessageTimestampis recent. The pipe received the files. Run the following query to see the status of each file, and the error if a load failed:sqlSELECT * FROM TABLE(INFORMATION_SCHEMA.COPY_HISTORY( TABLE_NAME => 'REALM_EVENTS', START_TIME => DATEADD(hour, -1, CURRENT_TIMESTAMP())));
Every Column Is NULL
The output feed does not use the Data Lake format. Edit the output feed and set Format to Data Lake.
Amazon S3 Checks
- Check that the Key Prefix on the output feed starts with
realm/and ends with/. - In the S3 console, check that new files arrive under
realm/. If no files arrive, check the IAM user policy from Step 2. - Check that the event notification from Step 6 uses the prefix
realm/and thenotification_channelvalue ofREALM_S3_PIPE.
Data Lake Format
Each file contains newline-delimited JSON objects, one object per event. Each object has these top-level keys:
json
{
  "raw": "<original log line>",
  "parsed": { "...": "parsed event fields" },
  "observables": {
    "ip_address": ["192.0.2.10", "198.51.100.7"],
    "username": ["alice"]
  },
  "realm_metadata": {
    "source": "<source name>",
    "source_type": "<source format>",
    "event_type": "<event type>",
    "input_feed": "<input feed name>",
    "output_feed": "<output feed name>",
    "destination": "<destination name>",
    "collector": "<collector name>",
    "event_timestamp": "2026-10-30T14:05:11.123Z",
    "ingested_at": "2026-10-30T14:05:12.456Z"
  },
  "enrichments": [
    {
      "src_field": "<event field>",
      "dataset": "<enrichment dataset>",
      "dataset_field": "<dataset field>",
      "value": "<value>"
    }
  ]
}- Realm omits a key when it has no value. For example,
realm_metadata.collectoris present only for events that a Collector forwarded, andenrichmentsis present only when enrichments are enabled for the output feed. observablesmaps each observable type to an array of string values.event_timestampandingested_atare RFC 3339 strings. To query them as timestamps, cast them, for exampleREALM_METADATA:event_timestamp::TIMESTAMP_TZ.
Support
For more information about Snowpipe, refer to the Snowflake documentation:
Amazon S3: